The world of education has undergone a remarkable transformation in recent years, especially with the advent of online learning. In the next decade, e-learning is expected to become even more ubiquitous.
This is a result of new trends and innovations shaping the industry. From essay examples and research papers to creative writing and professional services for crafting essays, WritingBros provides a platform for individuals to improve their skills for writing essays. It also helps students to achieve their academic or professional goals.
The website features a team of experienced writers dedicated to providing high-quality essays that meet the specific needs of each student.
This article explores the predictions and trends for the future of online education. It also discusses that online smart classes are the future of education. So, let’s get started.
What Is E-Learning?
E-Learning (electronic learning) is a modern way of studying that takes place through digital devices like;
Computers,
Tablets, or
Smartphones.
In other words, it’s a type of education that doesn’t require you to attend a campus or interact with a teacher physically. Instead, you can access examples of resources such as;
Online courses,
Videos,
Lectures, and
Other educational papers.
It offers flexibility, convenience, and personalised learning experiences. All are tailored to your unique needs and studying style. And it’s a fantastic way to acquire new skills, knowledge, and qualifications from the comfort of your own home or office.
The Future Of Online Education
It’s believed that online learning is the future of education and is very promising. We can expect to see some exciting developments in the next decade.
Some of the key predictions and trends are;
Personalised Learning Experiences
E-learning platforms can provide tailored learning experiences customised to the individual learner’s needs and preferences.
This is achieved with the help of advanced technologies like;
Machine learning,
Artificial intelligence,
And data analytics,
This means that learners can access learning materials. Such as those relevant to their interests, goals, and learning styles. This results in a more engaging and effective learning experience.
Online learning platforms can track the learners’ progress and assess their strengths and weaknesses. It also provides personalised feedback to help them improve their learning outcomes. And as a result, enhance student engagement, motivation, and academic research performance.
Virtual and Augmented Reality
We can expect to see more VR and AR in the upcoming years. This is because online learning is the future of education. In e-learning, these technologies can provide learners with an interactive and engaging studying experience, such as scenarios that simulate real-world situations.
For example, architecture students can use VR to explore and design buildings. At the same time, language learners can use AR to practise speaking with virtual conversation partners. They can also provide learners with hands-on experience in dangerous or costly environments. Such examples are pilot training or hazardous materials handling.
Adaptive Learning Technologies
These systems use data analytics and AI to personalise the studying experience for each learner. These technologies can analyse learners’ progress. This helps provide them with personalised feedback, recommendations, and learning pathways.
They can also identify gaps in learners’ knowledge and provide them with targeted content to fill those gaps. With adaptive learning technologies, learners can receive tailored studying experiences. This helps meet their unique needs and improve their exam scores and research outcomes.
Gamification
This involves using game mechanics in non-game contexts to motivate and engage learners. It is an effective way to make learning fun and interactive. And, in return, increase learner engagement and motivation.
Gamification strategies include;
Points,
Badges,
Leaderboards,
And challenges
They can be used to create a competitive campus environment that motivates learners to achieve their learning goals.
Microlearning
This is a learning approach that delivers small and bite-sized content to learners. Microlearning provides students with concise content that is easy to digest, retain and apply. This is contrary to conventional textbooks. This also improves their exams score.
With the rise of mobile devices, microlearning is becoming more popular. And as such, learners can access short learning modules on the go without using paper. With this model, students can access the information they need to solve problems or perform tasks without books.
Skills-based Learning
With the help of e-learning platforms, learners can access a wide range of skill-based courses. Especially those that are designed to meet the demands of the job market.
This means that learners can learn in-demand skills such as;
Coding,
Digital marketing,
Data analytics,
And project management
Conclusion
If online learning is the future of education, the prospect looks bright, with e-learning becoming an integral part of the campus teaching system. Smart classes will give learners access to high-quality education, regardless of location or circumstances. This enables them to learn and acquire new skills flexibly and conveniently without physical books.
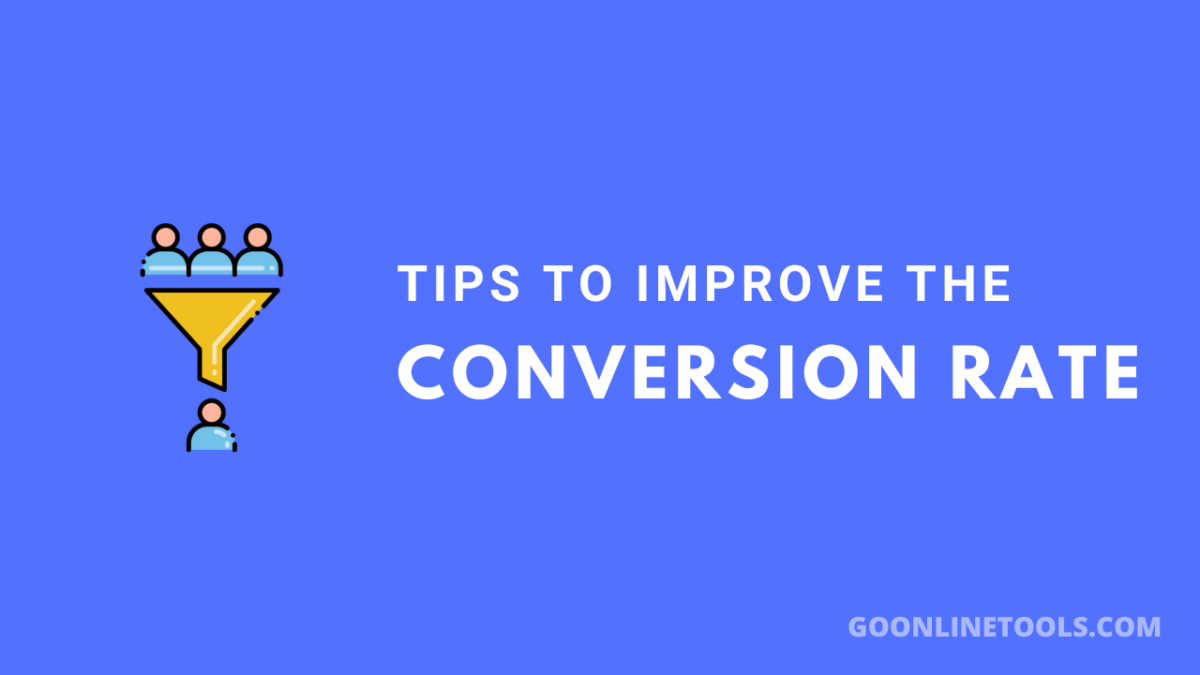
When we start working with SaaS companies, it’s not uncommon for us to discover that their landing pages have extremely low conversion rates.
The after-effect is that it’s significantly more difficult to get the right customers to connect with your message and ultimately convert. And a poorly converting landing page at the beginning of the customer journey hurts sales. In this article, we’ll look at some ideas for getting these results for our customers.
Ensure your value message is clear and easily visible on the landing page
A value message is a short statement that concisely and clearly describes your product or service’s main benefit. When writing a value message, it is important to keep the following in mind:
Focus on the benefit: instead of talking about the features of your product or service, focus on how it can improve your customers’ lives or work.
Be specific: instead of saying “click here,” state exactly what will happen when the visitor clicks, such as “download our free report.” It is also essential to have correctly and competently written text, so if you do not have a copywriter, applying to the “write my paper for free” type of service makes sense.
Make it easily visible: make sure your value message is prominent and easily visible on your landing page.
Keep it short: avoid using flowery or technical language; instead, use clear and simple language.
Experiment with different designs: test a variety of sizes, colours, and placements for your value message to see what works best for your landing page.
Use a strong, clear call to action so visitors know exactly what they should do
A strong, clear call to action is essential for any landing page, as it tells visitors what to do next. Here are some tips for writing an effective call to action:
Use an action verb: use verbs like “get,” “discover,” and “learn” to encourage visitors to take action.
Be specific: instead of saying “click here,” state exactly what will happen when the visitor clicks, such as “download our free report.”
Use a tone of urgency: use words like “now,” “immediately,” or “quickly” to create a sense of urgency and encourage visitors to take action right away.
Make the call to action prominent: make sure the call to action is easily visible and doesn’t get lost among the rest of the page content.
Experiment with the design: test different sizes, colours, and locations for the call to action to see what works best for your landing page.
You might be interested to know what a Call to action is and how to generate impactful CTAs. We know that with this, you will be able to make your SaaS landing page a success.
Make navigation easy and clear, so visitors can easily find what they are looking for
Clear and easy navigation is essential for any landing page, as it allows visitors to easily find what they are looking for and navigate your site. Here are some tips to make your landing page navigation easy and clear:
Use a simple, user-friendly navigation menu: make sure the navigation menu has a clean design and use clear titles for the different sections of your site.
Use clear text links: avoid using generic text links such as “click here” and instead use descriptive titles that indicate exactly where the links will lead.
Use icons and graphics to supplement navigation:Icons and graphics can be useful, but ensure consistency and provide text labels for those that may not be intuitive.
Provide a search function: if your site has a lot of content, it is helpful to include a search bar so visitors can easily find what they are looking for.
Make navigation consistent throughout the site: ensure it is consistent throughout the site so visitors know how to find what they are looking for on any page.
Add customer testimonials and reviews to demonstrate the reliability and value of your product
Customer reviews and testimonials are important on landing pages for several reasons:
Help visitors make a buying decision: Customer reviews and testimonials provide an unbiased perspective on your product or service, which can help visitors make a buying decision.
They increase trust: customer reviews and testimonials can help increase visitors’ confidence in your product or service by providing evidence that others have had success with it.
Help improve your SEO: customer reviews and testimonials can help improve your site’s SEO by providing unique and relevant content for search engines.
Improve user experience: Customer reviews and testimonials can improve the user experience by providing valuable and useful information to visitors.
Customer reviews and testimonials are an important part of any landing page, as they can help increase visitor trust and improve your site’s SEO and user experience.
Use images and videos to make your page more attractive and easy to understand
Images and videos can go a long way in making your landing page attractive and easy to understand. When choosing images and videos for your landing page, it is important to keep the following in mind:
Choose high-quality images: high-quality images can help enhance your landing page’s appearance and give visitors a good first impression.
Use relevant images: make sure to use images relevant to your product or service to help visitors better understand your offer.
Use videos to demonstrate your product or service: videos can be very useful to demonstrate how your product or service works and provide a more detailed view of your offer.
Use subtitles for videos: if you use videos on your landing page, be sure to provide subtitles so visitors can understand what you are saying without turning the volume up or using audio.
Use images and videos consistently: make sure to use images and videos consistently throughout your landing page to keep the visitor’s attention and avoid distractions.
Test different versions of your landing page using A/B testing techniques to see which one works best
Remember that A/B testing is a tool that will help you know what works best for your users. According to figures, 58% of marketers use this technique to make informed project decisions.
To carry out an A/B test, follow these steps:
Choose a hypothesis: determine which element of your landing page you think might affect conversion and hypothesise how to improve it.
Create two versions of the landing page: create two versions of the landing page, changing the element you selected in the hypothesis.
Test: use an A/B testing tool to randomly show each version of the landing page to a portion of your audience and record the results.
Analyse the results: compare the results of the two landing page versions and determine which was more effective in terms of conversion.
Implement the changes: if one of the landing page versions had a higher conversion rate, implement those changes on your main landing page.
Offer a free trial or a trial version so visitors can test your product before committing
Offering a free trial version of your product or service can effectively increase conversion on your SaaS landing page. Some ways you can make the free trial version help conversion are:
Make the free trial offer prominent: make sure the free trial offer is easily visible on your landing page, either in a prominent banner or an eye-catching button.
Provide a clear description of what the free trial includes: Be sure to provide a clear and detailed description of what the free trial includes so visitors know exactly what they are getting.
Emphasise the non-commitment of the free trial: be sure to emphasise that the free trial has no commitment and that visitors can cancel at any time at no cost.
Provide an easy-to-complete sign-up form: make it easy for visitors to sign up for the free trial by providing an easy-to-complete sign-up form.
Follow up with visitors who sign up for the free trial: use an email tracking tool to send visitors who sign up for the free trial follow-up emails to keep them interested and encourage them to try your product or service.
Make sure your landing page is optimised for mobile devices
Your landing page must be optimised because more and more people are accessing the Internet through their phones. So, a landing page optimised for mobile devices can increase the conversion of your SaaS landing page for several reasons:
Increased reach: more and more people are accessing the Internet through their mobile devices, so a mobile-optimised landing page will allow you to reach a wider audience.
Better user experience: A mobile-optimised landing page improves user experience, as it loads faster and is easier to use on a smaller screen.
Higher conversion rate: landing pages optimised for mobile devices tend to have a higher conversion rate, providing a smoother and more seamless user experience.
Higher search engine visibility: Search engines, such as Google, prioritise mobile-optimised landing pages.
Use remarketing techniques to reach visitors who have abandoned your landing page without converting
Remarketing is an online advertising technique that allows you to show ads to visitors who have passed by your website at some point. By using remarketing to show ads to visitors who left your SaaS landing page without converting, you can increase your site’s conversion rate in several ways:
Stay top of mind: remarketing allows you to stay top of mind with visitors who leave your site without converting, which can help increase the likelihood that they will return to your site and convert.
Offer relevant content: use remarketing to display ads with relevant content to visitors who left your site without converting to keep them interested and encourage them to return to your site.
Offer an incentive: use remarketing to offer an incentive to visitors who left your site without converting, such as a discount or special offer, to increase the likelihood that they will return to your site and convert.
Track your performance: Use a tracking tool to measure the performance of your remarketing campaign.
You already know what to consider when making your landing pages for Saas companies. Put them into practice and see what you can achieve.
See you in the next post with very practical tips!
Lately, educators have been increasingly making use of digital resources. Increasing student responsibility is a crucial advantage of online education.
College kids will be responsible for their own learning. The reason is that they have more say over the subjects and the methods by which they learn them. The use of these tools also improves the quality of education. Students have access to more materials and can make the whole process personalized, regardless of it being a master’s degree, a bachelor’s, or a doctoral program. Read on to learn about the top e-learning tools and the benefits they can bring.
What Is The Effective Use Of Digital Learning Tools?
Efficiency implies achieving the desired results. At the same time, the use of resources should be appropriate. For example, you need to write an essay or research paper. In this case, it will be reasonable to familiarize yourself with examples of such works on the Internet. Then one needs to use Eduzaurus or another plagiarism checker to ensure your assignment is unique. Before giving the final version of the paper to the teacher, you want to proofread too. Programs like Grammarly can help with that. All these tools save you time while enhancing the quality of your writing. It is the definition of efficiency. What does this mean in the context of digital tools for education? Let’s figure it out.
It’s easy to feel overwhelmed by the magnitude of the work of integrating digital technologies in the classroom. How to achieve the effective use of modern tools? It’s crucial to have an open mind. Try the new and be ready to draw conclusions about the use of a particular tool just for your case.
Also, the instructor should ensure that pupils can follow courses and learn to utilize new digital tools at their speed. Schools don’t have to make the switch to e-classrooms overnight. Instead of making sweeping changes all at once, it’s best to focus on enhancing some foundational procedures. Assuming they are now a part of your daily lesson plans, you may move on to more complex solutions.
What Are Digital Learning Tools?
Educators at every experience level may discover plenty of useful digital materials online. Even though many valuable materials are freely available, some schools may choose to pay for digital textbooks or other necessities. Here are examples of digital learning tools that may be incorporated into classroom instruction.
In the case of mathematics and science, simulations and interactive models may be very beneficial.
An average student may benefit greatly from the use of visual aids like charts, graphs, and public-domain pictures and photos.
Videos on the Internet may be used to illustrate points better. If schools use a filtering system, then students may safely utilise YouTube.
Using podcasts and other forms of audio, like music, helps engage students and reaches those who study in a variety of ways.
Furthermore, it’s possible to learn while having fun using online educational games.
Of course, the list does not include all possible options. However, this is sufficient to form a general view of the topic.
What Are Digital Tools In An Online Class?
The format of online learning is becoming increasingly popular. And it is not surprising. This way, you can get new knowledge regardless of time and place. The best platforms also allow individuals to study at their pace. Teachers and students also use special programs for this purpose. Here are the most popular types of such tools.
LMS
An instructor can get timely feedback on students’ progress via formative and summative online tests. A learning management system (LMS) is a virtual classroom that allows instructors to track and evaluate their students’ progress in real-time. iSpring Learn LMS is the most comprehensive platform for online education.
iSpring Learn LMS, GoSkills LMS are the most comprehensive platforms for online education.
GoSkills LMS
GoSkills LMS offers a dynamic online learning platform designed to empower individuals and teams with essential skills for success. From business to technology and beyond, our curated courses are crafted by experts to ensure practical, engaging learning experiences. Join thousands of learners worldwide who trust GoSkills to master new skills, advance their careers, and achieve their goals efficiently and effectively.
Curated courses crafted by industry experts for practical, real-world application.
Personalized learning paths that adapt to individual goals and pace.
Flexible, on-demand access to high-quality content anytime, anywhere.
Experience the future of learning with GoSkills LMS and unlock your full potential today.
Instruments Of Discourse
Communication tools are digital mediums that facilitate interaction between learners and teachers. These programs often focus on facilitating group conversations. Therefore, they provide more options for setting up online communities and holding discussions than other types of educational software.
Online Learning Tools
This type of tool usually refers to a website where students can access a variety of educational info. There can be articles, tests, and games. Providing students with access to different learning resources is a top priority. So, such instruments are always in demand. A student’s interest and motivation to study and grow may increase in this setting.
Conclusion
Because of their proximity to the students and their ease of use, digital tools improve classroom practice. Through inquiry-based teaching, they encourage natural curiosity and help individuals develop their analytical thinking and creative problem-solving capacity. In addition, students may utilize digital tools to develop and complete projects. Different programs can be used for online learning and also materials to improve students’ studying experience. Evaluate the benefits of a particular program and compare them to your needs. If these indicators are the same, use the tool.
Instagram Stories are a feature on the social media platform Instagram that allows users to post temporary photos and videos that disappear after 24 hours. These Stories can include a variety of features such as filters, stickers, text, and music. Users can view Stories from the people they follow by tapping on their profile pictures at the top of the Instagram app. Additionally, users can reply to Stories with messages or by sharing them to their own Stories. Instagram Stories are a popular way for users to share more casual, candid, and behind-the-scenes moments with their followers.
What is Anonymous Instagram story viewer tool
Anonymous Instagram story viewer tool is a powerful tool that allows users to view and access Instagram stories without having to follow the user or be in contact with them. It is an effective way for people to keep up with content posted by people they do not know, even if they are not connected on Instagram.
This tool works by allowing users to search specific stories on the platform through hashtags or keywords. It then displays all relevant results which can then be viewed privately and anonymously. Users can also access stories that have been shared publicly by other users who they do not follow. Additionally, the Anonymous Instagram Story Viewer Tool also enables users to monitor popular trends and topics related to their interests and areas of expertise.
The Anonymous Instagram story viewer tool provides a variety of features such as story preview, story saving, and sharing abilities. This means that users can take screenshots of stories before viewing them in full detail or save stories for future viewing without having to log into their own account every time. Furthermore, this tool also includes features like analytics which allow users to track metrics such as how many people have viewed their story or how far it has spread across the platform.
Overall, Instagram Story Viewer Tool offers an incredibly useful and convenient way for users to explore content posted on the platform without having to follow anyone or be connected with them in any way. It is a great resource for those who want to stay up-to-date with news, trends, and entertainment without needing an account on the platform.
TOP-10 Instagram story viewers: Pros and Cons
InstaStories.watch
Pros:
Easy-to-use interface
No login or registration required
Can view and download both photos and videos
Supports multiple languages
Offers a bookmark feature to save stories for later viewing
Cons:
Ads may be present on the site
May not work with private accounts
StoriesIG.me
Pros:
Can view and download both photos and videos
No login or registration required
Supports multiple languages
Cons:
Can be slow to load and may require multiple attempts to view a story
Ads may be present on the site
May not work with private accounts
InstaDP.com
Pros:
Can view and download both profile pictures and stories
No login or registration required
Offers a search feature to find users and stories
Cons:
Ads may be present on the site
Limited functionality compared to dedicated story viewers
IgAnony.com
Pros:
Can view and download both photos and videos
No login or registration required
Cons:
Ads may be present on the site
Limited functionality compared to dedicated story viewers
May not work with private accounts
InstaStory.net
Pros:
Can view and download both photos and videos
No login or registration required
Cons:
Ads may be present on the site
Can be slow to load and may require multiple attempts to view a story
May not work with private accounts
Insta-Stories.ru
Pros:
Can view and download both photos and videos
No login or registration required
Offers a search feature to find users and stories
Cons:
Ads may be present on the site
Limited functionality compared to dedicated story viewers
May not work with private accounts
InstaStoryViewer.com
Pros:
Can view and download both photos and videos
No login or registration required
Cons:
Ads may be present on the site
Can be slow to load and may require multiple attempts to view a story
May not work with private accounts
Storiesdown.com
Pros:
Can view and download both photos and videos
No login or registration required
Cons:
Ads may be present on the site
Limited functionality compared to dedicated story viewers
May not work with private accounts
StoryDownloader.net
Pros:
Can view and download both photos and videos
No login or registration required
Cons:
Ads may be present on the site
Limited functionality compared to dedicated story viewers
May not work with private accounts
StorySaver.net
Pros:
Can view and download both photos and videos
No login or registration required
Cons:
Ads may be present on the site
Limited functionality compared to dedicated story viewers
May not work with private accounts.
How to use Instagram story viewer for viewing stories
To use InstaStories.watch for viewing Instagram stories, follow these steps:
Open the InstaStories.watch website in your web browser.
Enter the Instagram username of the person whose story you want to view in the search bar and press “Enter” or click on the magnifying glass icon.
The website will load the user’s recent stories, and you can view them by clicking on each one.
To view older stories, click on the “Load More” button at the bottom of the page.
If you want to download a story, click on the “Download” button beneath the story.
How to use Instagram story viewer for downloading stories
To use InstaStories.watch for downloading Instagram stories, follow these steps:
Go to the InstaStories.watch website using your preferred web browser.
Enter the username of the Instagram account whose story you want to download in the search bar.
Click on the “Download” button next to the user’s profile picture.
The website will then show you all the stories available to download.
Click on the “Download” button next to the story you want to save.
The story will be downloaded to your device in MP4 format.
As a student, you want to be as productive and efficient as possible, so that you’ll have enough time for all your plans. Sometimes, to be productive and focused stays solely in your power; other times, your devices and gadgets can boost them. This is the case with Macs, some of the most popular and user-friendly laptops for students and not only. There are some Mac tips and tricks for students that will help them use all the features a Mac comes with that will make them more productive.
10 Tips on How to Optimize Student’s Mac
Are you the proud owner of a Mac computer and trying to figure out how to get the most out of it? Whether you’re a student navigating your studies or just want to make sure your computer is running as efficiently as possible, check out these 10 Mac productivity tips.
#1 Dark Mode
University life is full of academics and late-night studying. To protect your eyes from the strain of blue light, enable ‘Night Shift’ on your Mac which will automatically adjust screen luminosity according to time – regardless if it’s for essays or freelance writing!
#2 Use Specialized Fonts
Fonts play a big part in communication – not only do they add style, but the right font can also affect readability and information retention. Sans serif fonts like Arial, Calibri, or Roboto are ideal for electronic devices as they provide greater clarity than other variations when viewed on-screen. To maximize success proofreading wisely you should use DP Sans Mono; this specialized typeface was designed specifically to achieve just that! Remember too ‘Sans Forgetica’ which has been scientifically proven to help retain knowledge by making it difficult to read: an innovative concept developed at RMIT University Australia!
#3 Install a VPN
Don’t underestimate the importance of a VPN in learning. On the one hand, the VPN extension provides access to any material in the world that might otherwise be blocked by the site’s regional restrictions. On the other hand, VPN protection allows you to study safely even when connected to public Wi-Fi. To better understand how does a VPN protect you, you should know that any public Wi-Fi network can intercept your data and then use it against you. VeePN uses 256-bit encryption – the best technology in the VPN world, guaranteeing a secure connection. This is a no-lag VPN, meaning you can even watch high-definition videos without any problems. To sum it up, a VPN is all about security, easy access to any site, and high connection speed. It has everything you need to improve student productivity.
#4 Sync Your iCloud Account
College students, don’t let your laptop crashing or breaking leave you stranded! By syncing with iCloud, all of your documents will be safely stored online and accessible across any Apple device. So sign up today to protect yourself from potential data loss – it’s as easy as connecting an existing account if you already have another Apple product in your life. With the convenience of being able to access Mac files wherever you are anytime, get ahead on safeguarding important notes and projects now!
#5 VoiceOver
With macOS VoiceOver, you can transform any text into an auditory experience! This feature makes studying course material a breeze and even allows students to multitask while reading lengthy portions of the content. It’s also helpful for proofreading texts; the robot voice will help catch errors that may have been missed after multiple readings. Accessible with just two clicks (or one quick key combination) in System Preferences > Accessibility > VoiceOver, this technology lets us hear our work read aloud so we don’t have to strain our eyes – perfect for late-night cram sessions or endless research projects
#6 Clean Up Your Desktop
Having a cluttered desktop can be distracting and overwhelming. Instead of relying on folders and icons to manage your files, consider taking an active approach by sorting them into different areas in your home folder. You could also use Finder windows for quick drag-and-drop file transfers when needed – all while foregoing the extra visual clutter caused by having a wallpaper or too many objects on screen at once!
#7 Create Separate Users
Keep your digital life organized by creating separate user accounts for work and home. Downloading Slack with a specialized business account and Messages with another private one will help you stay on top of all tasks without the clutter of unnecessary information polluting each other’s space. In addition, setting up different fingerprints in System Preferences > Touch ID will make fast switching between users quick & easy!
#8 PDF Webpages
College students can take their research to the next level with just a few clicks! By exporting articles as PDFs, they can keep track of useful resources without cluttering up their bookmarks – resulting in simpler studying and smoother course planning. Just remember about security, so as not to accidentally get on a virus-infected site. It is especially important to remain vigilant when downloading something. This is where a VPN can help. If you still doubt the usefulness of such an application, just see at the VPN reviews and you will understand how many dangers there are around. In fact, a VPN is more important than you think.
#9 Learn the Trackpad Gestures
College students juggling multiple projects can now save time with macOS’s new trackpad gestures. With a simple swipe, they can jump between pages or apps and scroll & zoom in an instant – no more tedious switching! Take advantage of this great feature to increase your productivity today.
#10 Taking Screenshots
Taking screenshots on Mac is an incredibly simple task. All it takes, thanks to the user-friendly aspect of Apple’s devices, is a touch of your fingertips and you’re off! Just hit command + shift + 3/4 for desktop or section capturing – whichever works best at that moment -and voila; instant screenshot saved. No waiting necessary – get editing right away with this awesome shortcut!
Conclusion
College students can benefit greatly from the many features that come with Mac devices. From VoiceOver to trackpad gestures, there are plenty of tools available to help make studying and other tasks easier and more efficient. Taking advantage of all these great opportunities will only increase productivity and success! It’s worth taking a look at what macOS has to offer.
No need to struggle through student life in the 21st century – there’s an app for everything! From apps that help you stay focused, find discounts, and keep track of notes. Our list is here with 10 great services for every student heading into 2023 – transforming any device into a reliable study companion.
#1 Evernote
You need an app that can help keep all your notes and tasks organized. Enter Evernote: the best app for students to effortlessly create, manage and organize every single thought or task! Unlike traditional note-taking which only includes text-based components; this world-class software lets users form their own ‘electronic notebooks’ using a combination of photos, drawings (handwritten included!), audio clips – even connecting web content too – so nothing gets lost ever again. Furthermore, its advanced features include tagging labels to each file, attaching documents as well as flagging important reminders when needed — making time management easier than ever before… Don’t miss out on the best note-taking experience with Evernote!
#2 Forest
If you are looking for great services to help students to study without being distracted by their phones, then we have the solution. Forest is the perfect solution. This app encourages users to start a study or focus session by planting virtual trees in their forest, giving them an incentive not to break away from working on something important. As you continue focusing for longer periods of time, more trees will grow; however, if the user does give in to distraction then the tree dies instantly! The added bonus is that with each planted digital tree real ones are also being supported – making it easier than ever before to maintain productivity (and make our planet greener!).
#3 PDF scanner
It can be inconvenient that you do not have a digital copy of a document. Looking for or buying a physical scanner is not the best solution. Just use the PDF scanner and you can do what you want with your phone. The scanning tool is able to recognize text and keep it in focus, so nothing will merge. Then you can even convert PDF to docs. All you need is to download the scanner app for iOS and point the camera at the document. Scan docs have never been as easy as it is now.
#4 Motion
University students are all too familiar with the struggle of trying to stay focused and productive on their laptops. It can often feel like notifications were designed specifically as distractions, making it extremely difficult to study without taking a quick peek at social media sites for dopamine-releasing relief. Fortunately, there is an alternative: Motion – a free browser extension that blocks out these tempting digital temptations from websites such as Facebook and YouTube so you can do what needs doing without distraction! Plus it’s totally customizable to fit your goals and lifestyle perfectly!
#5 RefME
Need a break from struggling to correctly reference your research papers and essays? RefME has got you covered! With its clever app, finding and citing resources is so much easier – plus it can automate tedious tasks like citations, reference lists, and bibliographies. You’ll no longer have to spend hours trawling the web for relevant reading material or going cross-eyed trying to make sure every detail is accurate – giving you more time for what really matters: honing your academic skills.
#6 SimpleMind
For those who find mind mapping an effective way to organize their thoughts, SimpleMind is the perfect solution. Available as both a browser version and an app for mobile devices, it provides everything one needs to quickly create detailed maps without having to purchase any additional features. With options such as multiple page creations with various colors, along with pre-defined style sheets in case of time-crunching urgency – its best feature is expandable/collapsible branches that help manage large amounts of information while using small space on screens!
#7 Mathway
Don’t fear Maths any longer – downloading Mathway could be the key to tackling numbers like a pro! Whether you have basic calculations or complex equations, this app can solve them for you and even give an explanation of how if needed. Students who’ve been dreading encountering figures in university (especially those in social science programs!) no longer need to worry; with one click away from conquering all things numerical, every problem is just another challenge waiting to be solved.
#8 Oxford Dictionary of English
No matter what type of phone you own, the Oxford English Dictionary (OED) app is an absolute must-have. The OED reigns supreme when it comes to definitions and spelling – plus, its ability to search a word just by taking a picture of it makes any academic’s life much easier! If that weren’t enough though, this amazing tool also provides users with “Word of the Day” notifications – expanding your vocabulary while impressing your teachers in one fell swoop!
#9 Picolo
Ready to get the party started? Try out Picolo, an app that kicks things up a notch with endless creative drinking game ideas! No need to worry about remembering complicated rules or keeping track of score – all you have to do is enter your friends’ names and let Picolo pull off some funny (sometimes inappropriate) rounds from other classics like Ring of Fire, plus exciting dares such as reading aloud someone’s last text. Whether it’s for freshers week or just another night in with your buddies, make sure everyone has plenty of laughs thanks to this perfect pre-drinks companion!
#10 Sleep Cycle
Each night, we strive to attain that glorious eight hours of sleep. Nevertheless, rising on the seventh morning can often be difficult – no matter how many jokes about students’ love for sleeping! Thankfully though with Sleep Cycle 2.0 now at our disposal, it’s possible to wake ourselves up during the lightest moments of slumber instead – giving us a refreshing feeling rather than an awful case of grogginess and grumpiness! To ensure you receive your best rest yet remember: 8 hours solid is essential but make sure whatever alarm app you use deals softly when it comes time to get out from under those cozy covers in the A.M.
Conclusion
There are plenty of apps available to help students stay organized and productive, but the best ones are those that embrace new technologies and innovative ideas. From mind mapping tools to educational resources, from creative drinking games to sleep trackers – there’s something for everyone! With these ten apps in your arsenal, you’ll quickly find yourself with more free time to relax and your learning outcomes will improve.
There are a lot of paraphrasing tools available nowadays. Given how commonly they’re used, it’s handy to have a lot of options to pick from.
If you’re looking to pick and use a paraphrasing tool for your writing needs, you can start by looking at the options enumerated below. We’ll look at five different AI-based paraphrasing tools and the quality of their results. We will also discuss their feature, pros, and cons as well as their pricing particulars.
With all these details, you will be able to make your pick easily and get started with a tool that works well for you.
Paraphraser.io comes at the top of our list due to three simple reasons: it’s free to start, it provides smart results and its interface is not encumbered with the usual deluge of annoying ads ubiquitous in most free online tools.
In order to give you a clear and accurate idea of how well this tool works, we tried it out a couple of times on different texts.
One thing to note about Paraphraser.io is that it comes with four different modes. All the modes provide different results. In the coming demonstration, we will use different modes in order to cover the functionality of this tool as much as we can.
Quality of Results: The Demonstration
One of the biggest issues that paraphrasing tools can face is context preservation. In a piece of tricky text, average-quality paraphrasing tools can get confused, thus ending up making nonsensical changes.
Keeping the above in mind, here is the text that we decided to run through Paraphraser.io. We made it a little contextually challenging in order to demonstrate how well the AI of this tool works. (This input is going to be a little short. We’ll do a larger test after this one.)
Input text: “Concomitant to sagacity is morality, often borne in men of religiosity. Far from being a linguistical anomaly, the veracity of this statement is manifest as clear as its brevity.”
Here is the output that Paraphraser.io gave out (using the Smart mode):
In the results, you can see how the tool understood the words “concomitant to sagacity” and changed them to “prudence involves…”
Apart from being an accurate paraphrase, one remarkable aspect of the output is the improved readability. The words “concomitant to sagacity” are, while sophisticated, needlessly convoluted. On the other hand, the words “prudence involves” are much simpler and better to read.
In the same way, the tool also changed the overly wordy phrase “men of religiosity” to “religious people”.
The above test didn’t involve a lot of text. Let’s run the process another time using some more words. Here is the text that we will be using this time.
“Idly sifting the autumn leaves through his fingers, the hunter followed the buck with his gaze as it grazed on the grass. As the hunter shifted his weight, a twig snapped, sending a loud crack through the air. The buck plucked his ears back, his dark eyes fixed on the hunter. The hunter pursed his lips as the buck pranced away into the dark forest.”
Although the changes were a little different this time, the context still remained largely unchanged.
Gleaning from the above results, we can say that Paraphraser.io provides smart outputs, given that you use the right modes. The Fluency mode is fine for basic use, but it is not very mind-blowing like the Smarter and Creative modes. The Standard mode, on the other hand, is good only for some raw synonym changing.
Features, Pros, and Cons
Now that we’re done looking at the results, let’s move on to the features provided by this tool. We’ll then enumerate some pros and cons so that you can get a good idea about the overall standing of this tool.
Features:
Comes with a total of four modes (Standard, Fluency, Creative, and Smarter)
Has an input limit of 600 words for free users and 1,500 words for paid users
Supports 22 different languages
Supports file uploads
Useful post-processing options such as copying, erasing, and downloading the output
Synonym suggestions by clicking on the highlighted words in the output
The second tool on our list is Rephrase.info. Although we will go through this tool the same way that we did above, the brief reason for mentioning it here in the second spot is the annoying ads around the interface.
As far as the functionality and accuracy of this tool go, it is on par with Paraphraser.io. Like Paraprhaser.io, Rephrase.info offers multiple modes, each of which is designed to provide a specific type of results.
Moving on, let’s do some test runs with this tool in order to demonstrate how accurate and reliable its results are. Since there are five different modes on this tool, we won’t be able to try them all out. Rather, we’ll stick to just a couple of them.
Quality of Results: The Demonstration
Like the one above, we will first use a short piece of text for the demonstration and then move on to some larger content.
The benefit of dividing the demo like this is that you’ll be able to get an idea of how well the tool performs in different situations. For example, if we just run a couple of lines through the tool, it won’t exactly be a good way to judge the overall quality.
For the first demo, here is the text that we will be using:
Input Text: “Arcane terminology is not moronic drivel, contrary to what the contention of the laity implies.”
Frankly speaking, and without being biased, the results that Rephrase.info provided for this input are baffling.
Output Text: “Ambiguoustermsare not asabsurdastheaveragepersonwouldmakethemout to be.”
The output looks nothing like the input we provided. Other than the meaning, virtually everything else has been changed, and that is the epitome of good paraphrasing: preserving the meaning with maximum textual changes.
But we have to stay fair. We did use the ‘Smart’ mode for this one, and it is pretty much the best out of the five. If we paraphrase this same text using the ‘Standard’ mode, here are what the results look like:
As you can see, in this output, the changes are not that extensive and the synonyms used are also not very on point.
While we’re mentioning this point to stay critical, it really doesn’t matter, in our opinion, what one of the less powerful modes of this tool does. Our concern is with what it can do at its peak (i.e., the Smart mode). And as far as that goes, the results were pretty good.
Now, let’s move on to another test to see how well this tool works on a larger piece of content. Here is the text that we will be using this time:
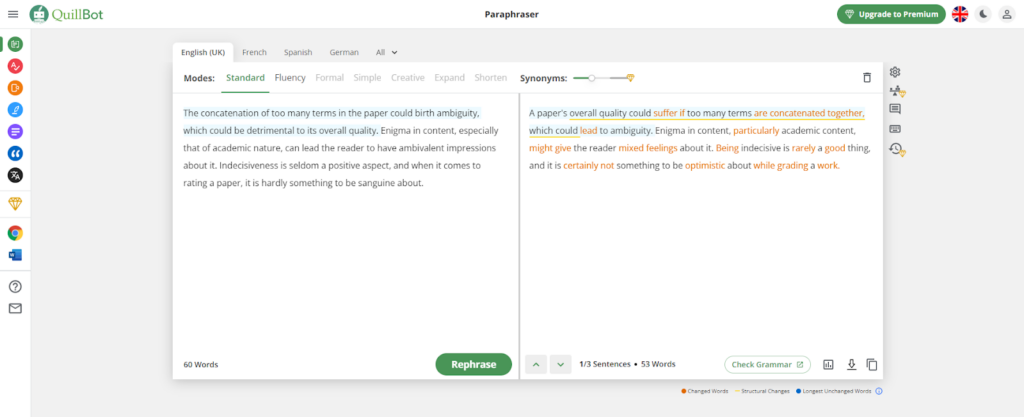
“The concatenation of too many terms in the paper could birth ambiguity, which could be detrimental to its overall quality. Enigma in content, especially that of academic nature, can lead the reader to have ambivalent impressions about it. Indecisiveness is seldom a positive aspect, and when it comes to rating a paper, it is hardly something to be sanguine about.”
It took time to come up with this twaddle. But the tool did impress us yet again. Here are what the results look like:
Other than the error/discrepancy in the last sentence, the rest of the output is along the same lines as the input. The good thing about the output is that the changes are not merely confined to synonym switching. Rather, the whole sentences are humanly rewritten.
Features, Pros, and Cons
Like the quality of the results, the features of Rephrase.info are also quite similar to those of Paraphraser.io. Here they are:
Comes with five different paraphrasing modes (Fluency, Standard, Creative, Smart, and Formal)
File upload feature
Supports 22 different languages
Useful post-processing options (such as copying, clearing, and downloading)
The third tool is Quillbot, a paraphraser that’s making big waves in the industry. It’s capable of rewording and reworking everything from short sentences to large paragraphs, and the tool comes with a whopping 5 modes (plus expand and shorten).
We also want to note that Quillbot can paraphrase in 23 different languages! Speaking of languages, did you know that you can also use Quillbot to translate text, check your grammar, and analyze your content for plagiarism? It can even act as a co-writer, summarizer, and citation generator. With Quillbot, you basically get an all-in-one writing companion!
But we’re here to talk about the paraphraser. Let’s see how Quillbot stands up against our tests.
1. Quality of Results: The Demonstration
Quillbot has a function called “try sample text,” but it seems to generate the same text every time. Instead, we’ll use a sentence Quillbot may not be used to so we can see if it keeps the context. First, we’ll start with a small quote and see what we get.
Here’s what we put into Quillbot:
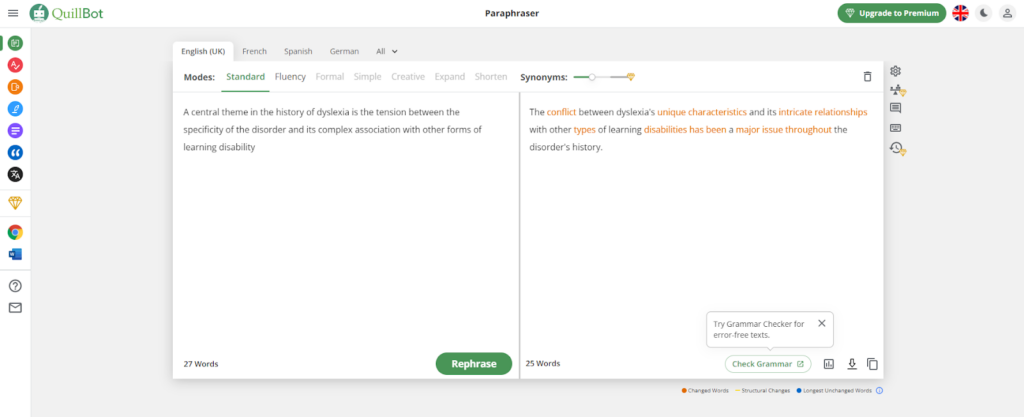
“A central theme in the history of dyslexia is the tension between the specificity of the disorder and its complex association with other forms of learning disability.”
Quillbot was more than capable of changing the entire sentence without throwing away the context. Not only that, but I could check the grammar and for plagiarism in the same tool. That’s important, as I can make sure I’m not unintentionally stealing another person’s work.
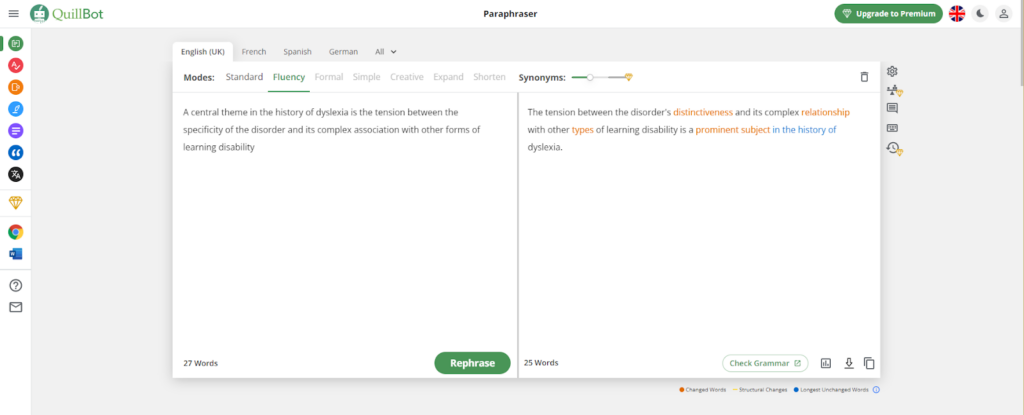
We also checked the fluency mode, and this is what Quillbot came up with:
Whereas standard mode works to change the text and keep its meaning, fluency mode improves language and fixes grammar errors. You can see that there’s a lot less orange (changed words) and one instance of blue (longest unchanged words), but that makes sense, considering the original text was already grammatically sound.
For testing the large paragraph, we’re going to use the same text from Rephrase:
Interestingly, Quillbot produced a different outcome than Rephrase. We feel that Quillbot did a better job at keeping the context and reducing the number of complex words.
2. Features, Pros, and Cons
Quillbots features are similar to the other paraphrasers on this list, but no other tool can compete with the variety it can bring. Here are the tool’s most important features:
Coming up third on our list is Wordtune. Wordtune is a popular name when it comes to paraphrasers because of its distinct style of working. It doesn’t work like normal paraphrasers (such as the two discussed above). Rather, it paraphrases the content line by line. For each line, it provides a lot of different outputs.
Sadly enough, the distinct feature of this tool is also the reason that we’re mentioning it here in the third spot. Since this tool works on a line-by-line basis, it cannot collectively paraphrase a lot of content at once.
We don’t want to paint this tool a bad picture right from the bat. Let’s take a look at the quality of its paraphrasing to find out how well it works.
Quality of Results: The Demonstration
We can’t text this tool out the same way as we did the ones above since Wordtune only processes the input sentence by sentence. So, instead of entering a small piece of text and then entering a larger one, we will just do one round and then analyze the results.
Here is the input that we will be trying out with Wordtune:
“Contumacy compounds ignorance when both of them are found in a man of low intellect.”
This input hardly makes sense, which makes it all the better for trying out the comprehending ability of a tool like Wordtune.
As we said above, Wordtune provides more than one result when the process is started. When we entered the above sentence in the tool, here are the results that we got:
Among the different rewrites that we got, this one was particularly impressive:
“Adding contumacy to ignorance in a man of low intelligence is a recipe for disaster.”
Although this particular rewrite was not exactly a bland statement as the input, it still is a good output that shows how far the tool goes to understand the entered text.
Features, Pros, and Cons
The demonstration section with this tool was a little short, but there isn’t much scope for diversity considering that it works sentence by sentence.
Now, let’s move on to look at its features, pros, and cons. Here are the features:
Free to access (with limited rewrites per day)
Different modes for paraphrasing
Option to shorten or expand the text
Editor Notes for finding and removing imperfections
Comes with formatting options in the online editor version
Moving on with our list, we have the paraphrasing tool by Editpad.org.
Unlike the tools we’ve looked at so far on our list, the paraphrasing tool by Editpad.org has a little clunky and outdated interface. The developers have been…generous with the ads and the whole interface looks very unsightly with all of them floating around.
If it was not for the results that this tool provides, we wouldn’t have mentioned it here on this list. But luckily for itself, the paraphrasing tool is equipped with advanced algorithms, due to which it provides coherent and intelligent outputs.
It also provides multiple modes, much like Rephrase.info and Paraphraser.io
Let’s test this tool out the same way we did the ones above.
Quality of the Results: The Demonstration
Like the other tools discussed above, the paraphrasing tool by Editpad also has multiple modes. We won’t actually test all of them, but we will try and get a couple of them.
To begin with, we will run a small sentence through this paraphraser to get an idea of how well it understands the provided input. For this purpose, we will be using the following sentence:
“The opprobrium disgorged by the person was mere vitriol, with no head nor tail i.e., it was neither here nor there vis-à-vis the topic at hand.”
Output:The opprobrium a person spat out was just venom without a head and a tail, ie. was neither here nor there in relation to the subject at hand.
As far as understanding the context goes, this tool performed well. The changes it made are all in line with the actual context and there aren’t any discrepancies.
But we did find one thing a little disappointing. The word “opprobrium” is a little difficult, but the tool did nothing to improve it. Had we entered this same sentence in any of the other tools above, we’re confident that they would have changed it.
Moving on, let’s put a larger paragraph in the tool to see how well it changes it. Here is the paragraph that we will be trying out:
“Deviating from his regimen, the person decided to take five pills instead of the prescribed two. The next evening found him lolling around his chair, his head drooped to one side. It later transpired that he had eaten 20 pieces of candy instead of the pills, and it was pure felicity that made him loll about.”
The output is a bit long so we won’t paste it here, but you can see what it looks like in the image above.
We used the “Smarter” mode for this test, and the results were not as good compared to the other tools we used above. There wasn’t any nonsense in there, but some of the words were not properly replaced.
Features, Pros, and Cons
Now that we’re done with checking the results, let’s take a look at the features, pros, and cons of the paraphrasing tool by Editpad.
Here are the features that you can enjoy with this tool:
Four different paraphrasing modes (Smooth, Formal, Smart, and Improver)
Although we’re mentioning Paraphraseonline.io at the end of this list, it’s actually one of our personal favorites. The blue and white layout with the no ads interface looks great, and the animated backdrop gives the tool some nice aesthetics that aren’t as easily found in other online tools.
Like the others, Paraphraseonline.io is free to access and it can be used indefinitely without any sort of subscription. It also provides smart results and provides an overall excellent user experience.
One of the most remarkable features that Paraphraseonline.io offers is its large input limit. You can enter 2,500 words in the tool in a single go. Considering the input limits given by the other tools, 2,500 words is quite generous.
Moving on, let’s take a look at how well this tool performs when it comes to actually paraphrasing content.
Quality of Results: The Demonstration
Since this tool doesn’t work like Wordtune and it has multiple modes, we will be running two different pieces of text in order to test it.
This is the first sentence that we will be using:
“Contrary to felicity is grievance, which manifests itself on the occasions when grievance is deemed natural.”
As you can see in the image above, the output is true to the actual context and there aren’t any nonsensical words in there.
One remarkable aspect of the results provided by this tool is that the structure of the first clause is changed entirely. This reflects the ability of the tool to make extensive changes to the content without losing touch with the context.
Moving on, let’s look at how well this tool works with large pieces of text. We did bash Editpad on the quality of its results, so to back that up, let’s take the same content that we used for it and put it into Paraphraseonline.io.
Comparing the results with the ones provided by Editpad, Paraphraseonline.io did a far better job.
Features, Pros, and Cons
Here are some of the features that you can enjoy with Paraphraseonline.io:
Four different modes are available
Multiple languages available
File uploads supported
Copy and download button available
Free to use
No need for registering
Pros
Cons
Easy-to-use interface
Nil
Smart outputs
Multiple modes available
No paid packages
Multiple languages supported
Pricing
No pricing plans for this one. Paraphraseonline.io is completely free to use.
Final Comparison
Before we wrap up this post, here is a table that outlines the main features of the above-mentioned tools. By looking at this table, you will be able to understand the strengths and weaknesses of each tool, which will hopefully help you make a better selection as per your need and requirement.
Tool
Paraphraser.io
Rephrase.info
Wordtune
Editpad.org
Paraphraseonline.io
Availability
Freemium
Freemium
Freemium
Freemium
Free
Number of modes
5
5
5
4
4
Quality of results
5/5
5/5
5/5
4/5
4/5
Input limit for free users
600
500
Limited daily queries for free users
1,000
2,500
Conclusion
So, there you have it.
There are a lot of paraphrasing tools that you can use in 2023, but there are only a few that are actually worth using. Hopefully, after reading the above, you have a good idea about which one you should use according to your particular need and requirement.
There are different types of writing with their objective. But one common attribute is that in all cases, the author must provide detailed information to help readers understand the topic. This is also true for expository papers. Most of us have written expository essays before, maybe not intentionally. Regardless, you need to know what goes into writing one to keep up with your coursework and assignments. This article explains everything you need about expository writing and tips for drafting the perfect paper.
What is expository writing?
This article is a type of expository writing. Expository is from the word ‘expose,’ which means to reveal something to someone. Therefore, the article explains, investigates, or ‘exposes’ information about a topic. It is like answering questions from someone who wants to know why and how things happen. As a result, you should assume that the reviewer does not know anything about the subject and simplify from scratch. Examples include newspaper articles, manuals, textbooks, and other forms of writing.
Can I order custom expository writing online?
Expository writing is not limited to the education field alone. Your supervisor can ask you to professionally submit a report or research essay topics. If you don’t have the skills to write one, we recommend you hire essay and expository writing services at Edusson.com to get into top schools or score a higher grade. Ordering custom expository essay writing online lets you leverage expert writers with more knowledge of the latest writing and formatting requirements. When you hire someone to write an expository essay, you can buy from a pool of professionals for guaranteed results.
What are the types of expository writing?
Expository writing comes in different forms, depending on the writer’s goal. The following are the most popular types:
Problem and solution
This type of essay is one of the common expository essays in literature. It requires the author to identify a problem and suggest a solution. Not only this, but you should justify the answer and explain the implementation analysis. For example, how to put your baby to sleep or solve a popular problem. Ultimately, the reviewer is free to adopt your recommendation or decide for themselves. This essay has four components, namely:
Situation.
Problem.
Solution.
Evaluation.
Let us assume you want to discuss a problem like gun violence or school shootings. First, explain the situation and state the problem. Then, suggest solutions like gun licensing, firearm age restriction, imprisonment, better security in schools, etc.
Cause and effect
A cause-and-effect essay defines the relationship between two elements or objects to know if one caused the other. Why did something happen, and what is its impact? The effect can either be negative or positive. But your main goal is to provide supporting evidence to demonstrate the relationship between the two ideas. This type of essay can be based on assumptions or facts. There are two ways to structure your essay:
Chain structure: you present the clauses one at a time, followed by their effects.
Block structure: you present all the clauses and then all their effects.
Compare and contrast
The compare and contrast essay is a comparison that attempts to check the similarities and differences between the two subjects. As a result, it is often used for ideas in the same category. For the best results, we recommend you research enough to elaborate on the pros and cons of the subjects. When discussing whether children should be allowed to play inside or outside, you must compare why it is vital and why one is worse than the other.
Definition and classification
Our article is a type of definition or classification essay. It describes a concept, place, or experience by adding depth to help comprehension. More than defining the concept, a classification essay summarizes by telling you the types and how many forms of a thing exist.
How-to/process
A how-to paper examines the process involved in completing a task. If you’re discussing how to increase your Etsy sales or cut a tree, the process essay must include procedures to solve the problem. The writer first identifies the problem, gives steps the audience will follow, and states the result.
Tips for drafting expository essay
Research extensively on the topic
One of the mistakes students make is failing to research their subject matter. Unknown to many, the only way to have sound knowledge about any topic. Pour through books, journals, materials, and online resources for information before writing.
Pick a structure
Most papers follow the introduction – body paragraph – conclusion format. But this is not mandatory. We recommend you speak to your supervisor or teacher about the number of paragraphs required and the word count. While researching information, take notes and use them to form your outline.
Form your thesis statement
The thesis is the main part of your essay. It sums up the central theme of your paper and appears at the end of the introductory paragraph. Ensure the statement aligns with the content of your essay for proper understanding.
Write an introductory paragraph
The opening paragraph determines whether the reviewer will read the entire essay. Start with a hook – something enticing to capture and pique your reader’s attention. Then, slowly ease into the main content and guide them through transitions.
Write the body paragraph
The paragraphs are equally important since they carry the weight of the paper. Format clearly and concisely, and include relevant information. Also, cite information and pay attention to your sentence structure.
Write a conclusion
The conclusion summarizes the entire text and restates the thesis. Use it to tie the ends of your essay and prompt the reviewer to take specific actions.
Tips for drafting an error-free paper
Write clearly without confusing the reviewer.
Use a paragraph to discuss only one idea.
Use facts, data, and updated sources to support your topic.
Cite sources to avoid plagiarism.
Use a table of content, page number, and similar outlines to make your paper easy to read.
Proofread and edit your essay before submitting it.
Conclusion
An expository essay allows you to convey information without personal opinion. Unlike other essays, success depends on how well you describe the information. Therefore, you must be clear and detailed. There are different types of expository papers. As a result, pay attention to the requirements before starting. Follow the tips above, and you will submit an A-grade expository paper.
Learners are actively engaged in individual studying. It is a continuation and deepening of the education process. The performance of such works allows students to explore the material more in-depth and creatively. Each creator has been involved in writing different research papers over the years, and it’s difficult to compare them. A person looks at an individual case and situation depending on the goals of the material. Moreover, such a research paper acquires skills of analytical comprehension of the obtained results.
What Is a Research Paper?
Many experts are trying to define this concept. In simple words, it is a specialist’s work describing the results of a human study with the use of specialized scientific methods. Not every student understands and distinguishes this category. Because of weak ideas and misunderstandings of the rules for preparing each of them, errors occur, provoking a decrease in the final mark, causing improvements, etc. In recent years, it has become possible to find essay examples or buy research paper online for those who are not confident in their abilities or do not have time to prepare such a serious document. It must necessarily present the relevance of the paper, goals, objectives, and the essence of innovation-stated ideas.
By publishing their works, the researchers secure the copyright to this or that idea. The ultimate goal of any scientific publication is to benefit a reader, so it is necessary to target your material to a specific audience. College students and not only them try to make their achievements more analytical and argumentative. Of course, the topic of your research may already be discussed and covered by others, but it will have distinctive features. This can be a big discovery or a tiny nuance that will distinguish your results from others. Otherwise, the work will lose its scientific value and may even be considered plagiarism.
Different Types of Research Article
Today, researchers distinguish several different types of writing. Many people compare them from various sides. Anyone can discover a lot of findings throughout the preparation of the material. If necessary, you should not be afraid to resort to the help of a qualified writing service. There are experienced and knowledgeable professionals who do everything according to the required standards and regulations. Let’s take a closer look at the different categories of work.
#1. Argumentative Papers
Such an assignment may not be suitable for everyone. If you doubt you can handle it, there is always a chance to purchase material from a specialist. But in general, argumentative papers are one of the most popular tasks that learners encounter during their education. There is a structure: an introduction, the main part, and a conclusion. Also, in such a piece, you study and analyze the problem and give arguments supporting or completely denying the statement. It seems like nothing is difficult. But if you write something in contrast, you can go down the wrong path.
#2. Analytical Papers
The analytical articles should look like a small study containing information materials and facts on the issue, expert analysis, and conclusions are drawn. Such material should be based on representative facts and truthful data. It is important to support the theoretical framework with tables, charts, diagrams, photos, videos, graphs, and illustrations. This gives validity to your study and inspires the trust of readers. Researchers demonstrate their knowledge and skills in this type of writing, just as they do in a professional essay. Therefore, adhering to the right structure and approach to preparing a complete material is important.
#3. Cause and Effect Papers
It is one of the first tasks that university learners face. They help track possible and potential outcomes. Take into account the answers to the questions:
“Why?”.
“What?”.
They reflect effects and causes. There are many types of research papers, and this is one of the most popular. The causal work aspects help you improve your knowledge in various studies. A typical structure describes a situation, presents consequences and reasons, and then draws final results.
#4. Problem-Solution Papers
It is a research paper that describes an issue and discusses possible solutions to that context. The main focus of such problem-solving writing usually consists of either argument in favor of a specific solution to the trouble or strong sides of an urgent need to solve the issue. Like most essays, such material should contain an introduction, a thesis statement, the main body, and a final part.
#5. Experimental Papers
It is one of the types of research papers in demand among students. In contrast to other variations, this direction has the advantage of an experiment. It occupies a leading place among the methods of scientific experience and often performs the function of a criterion for the truth of knowledge in general. The studied phenomenon is observed here under specially created and controlled conditions, which makes it possible to reproduce the course of the phenomenon when similar provisions are repeated.
#6. Reports
A report is a document that reflects the implementation of the research program and contains the data received, their analysis, and practical recommendations arising from them. Careful investigation of the obtained figures and facts is the main task of the report’s purpose. The structure of the work is determined by the goal of the research, its objectives, and its direct addressee. In logic, the sequence of describing the data obtained is related to the order of this or that procedure. The main thing is not to miss important information for the researchers and those who will read the results of the articles.
#7. Interpretive Essay
It is a prepared piece in which researchers identify, evaluate, and analyze the methods used by the creator in a particular work. You will need to answer questions such as “What were the main characters and events?” or “What tone did the author use?”. Encounter a similar task in many education fields. There is also an introduction, a main part, and an ending. It is important to consider all the points that should be present in such an essay, which is not to write the work in a different direction.
Which One Is More Popular Among Scholars And Why?
Every student is sure to have their top choice among the list of popular types of research papers. If you compare the different data, you can distinguish the main favorite. According to multiple sources, it is an individual argumentative essay. In contrast to the other types, this option is preferable and spells high marks. Nothing is surprising here. There is a purpose and object of the material. You need to give arguments and confirm them with facts step by step. If you, in the course of the work, it is necessary to show this and end beautifully.
The Bottom Line
In conclusion, every academic paper is important. These assignments are given for a reason. It is worth approaching them with special interest, adding the necessary definition, structure, facts, etc. Among so many types of research papers, there is always one that will be a favorite with learners. As recent statistics have shown, in this case, it is an argumentative essay in this case. If you strictly follow the rules for writing such material, you can get the highest score.
SMS marketing or business text messaging marketing involves sending messages to clients or users in order to promote your services and products. An opt-in marketing form, SMS marketing requires people to subscribe to your messages in order for you to be able to target them using messages. If you wonder how SMS marketing can benefit your business and how to create effective SMS offers, here’s all that you need to know.
Why Should You Use SMS for Business Growth?
It is easy for a customer to completely forget about your brand once they have purchased a product from you. One of the easiest ways to ensure your clients remember your brand is through SMS marketing. As people use their smartphones and check their messages regularly, it is easier to target them using offers and discounts and expect them to take action. Yet another advantage of SMS marketing is that it is very easy to integrate it with other marketing strategies and emphasize your campaigns. Being a versatile marketing mechanism will multifaceted benefits, SMS marketing is also very easy to implement.
7 Ways to Create SMS Offers for Better Sales
Here are some of the best ways to create SMS offers that can lead to better sales:
Identify Your Brand
It is crucial to identify your brand every time you send a message, as not all your customers or subscribers may have your number saved in their contacts. Further, they might also delete your messages after reading them. When you don’t mention the name of your brand in every text that you send, chances are high that several subscribers would have no idea who the message is from. This might nullify your attempts at marketing through SMS.
When it comes to the placement of the brand name in a text, it is best to mention your brand’s name right at the beginning of the message. This clearly informs your subscribers as to who is sending the message, making it easier for you to create an impact and accomplish your goal.
Personalized Messages
While businesses take pride in having plenty of data related to their clients and subscribers, none of it makes sense unless that data is put to use. Therefore, any additional information that you have about your clients can be utilized to create personalized messages. When you send a personalized message, it has a greater impact on the client and their buying decision.
Moreover, it makes them feel valued and builds a deeper relationship with the brand. You can personalize a message by adding the first name of your client when addressing them in the message, and you can also make use of information, such as their interests and preferences.
Start With the Deal/Offer
It is no surprise that people feel all the more motivated to shop when they’re given offers and discounts. Therefore, when you have special offers and discounts, it is best to start your message with the offer to grab the reader’s attention right away. There are several ways in which you can lead your message with the offer.
Some of the most common and effective ones are— buy one get one offers, % off discount offers, and free with purchase offers. Out of the three, buy one get one free seems to have the greatest impact, as this message clearly displays the value the buyer will derive from shopping.
Clear Redemption Instructions
The chances that your clients will redeem your offers are higher when the instructions for redemption are clear and simple. Therefore, it is best to not only provide clear and easy-to-follow instructions to your clients but also crucial that the instructions and the process are not complicated.
You can achieve this by sending your clients the code that can be entered into your website when they make the next purchase. Yet another way is by asking your clients to show the message at the store when they next visit. However, you can also use other variations and get creative as you send messages to your clients.
Add Expiry Date
One of the most effective ways to ensure your clients do their bit to redeem an offer is by clearly stating when the offer expires. This pushes buyers to make a quick decision, and it also adds a sense of urgency. A client who plans to use the offer and make a purchase is less likely to forget about your message and your offer when you use this trick.
Specific Targeting
While you can send as many messages to as many clients as you would want to, what makes SMS marketing effective is how well-targeted it is. Therefore, before you craft and send a message to your client, you need to first determine why exactly the client would open and read it. Specific targeting involves identifying your clients based on their preferences and needs before sending them an SMS. Simply put, a client will only read your message and act on it if they need the product that you’re advertising.
Key Takeaways
While the above-mentioned tips and tricks can help you get closer to the goal of having better sales through SMS marketing, it takes a mix and match and combinations of different factors. When marketing through SMSs, you need to be aware of the perfect timing and the right combination of words to create an impact. Further, measuring the success of your SMS marketing strategy by assessing your performance is extremely crucial to have a sense of how your strategy performs and the modifications you need to make in order to achieve your goal.
Effective SMS marketing is a combination of various factors that, when combined, have the kind of outcome that you desire. The only difference between poorly-performing SMS marketing and one that does well is how well you frame your message and how well you know your client. When done the right way, SMS marketing can significantly improve your sales while building a better relationship between your brand and your client.