Categories
Uncategorized

4 Steps to Optimize Images for Your Blog

If you want to know how to optimize images for your blog then this article is especially for you.

Image Optimization: What? Why? How?

What is image optimization? Actually, it’s a process of resizing and compressing images to the smallest possible size and weight without reducing the overall image quality.

So, why is image optimization so important for your blog? Here are some facts and statistics to demonstrate why it’s vital for your site. The very first thing to know is that delays are killing. Really. Thus, according to the studies, even a 1-second delay in page load can harm and result in:

  • 11% fewer page views;
  • 16% decrease in user satisfaction;
  • 7% loss in conversions.

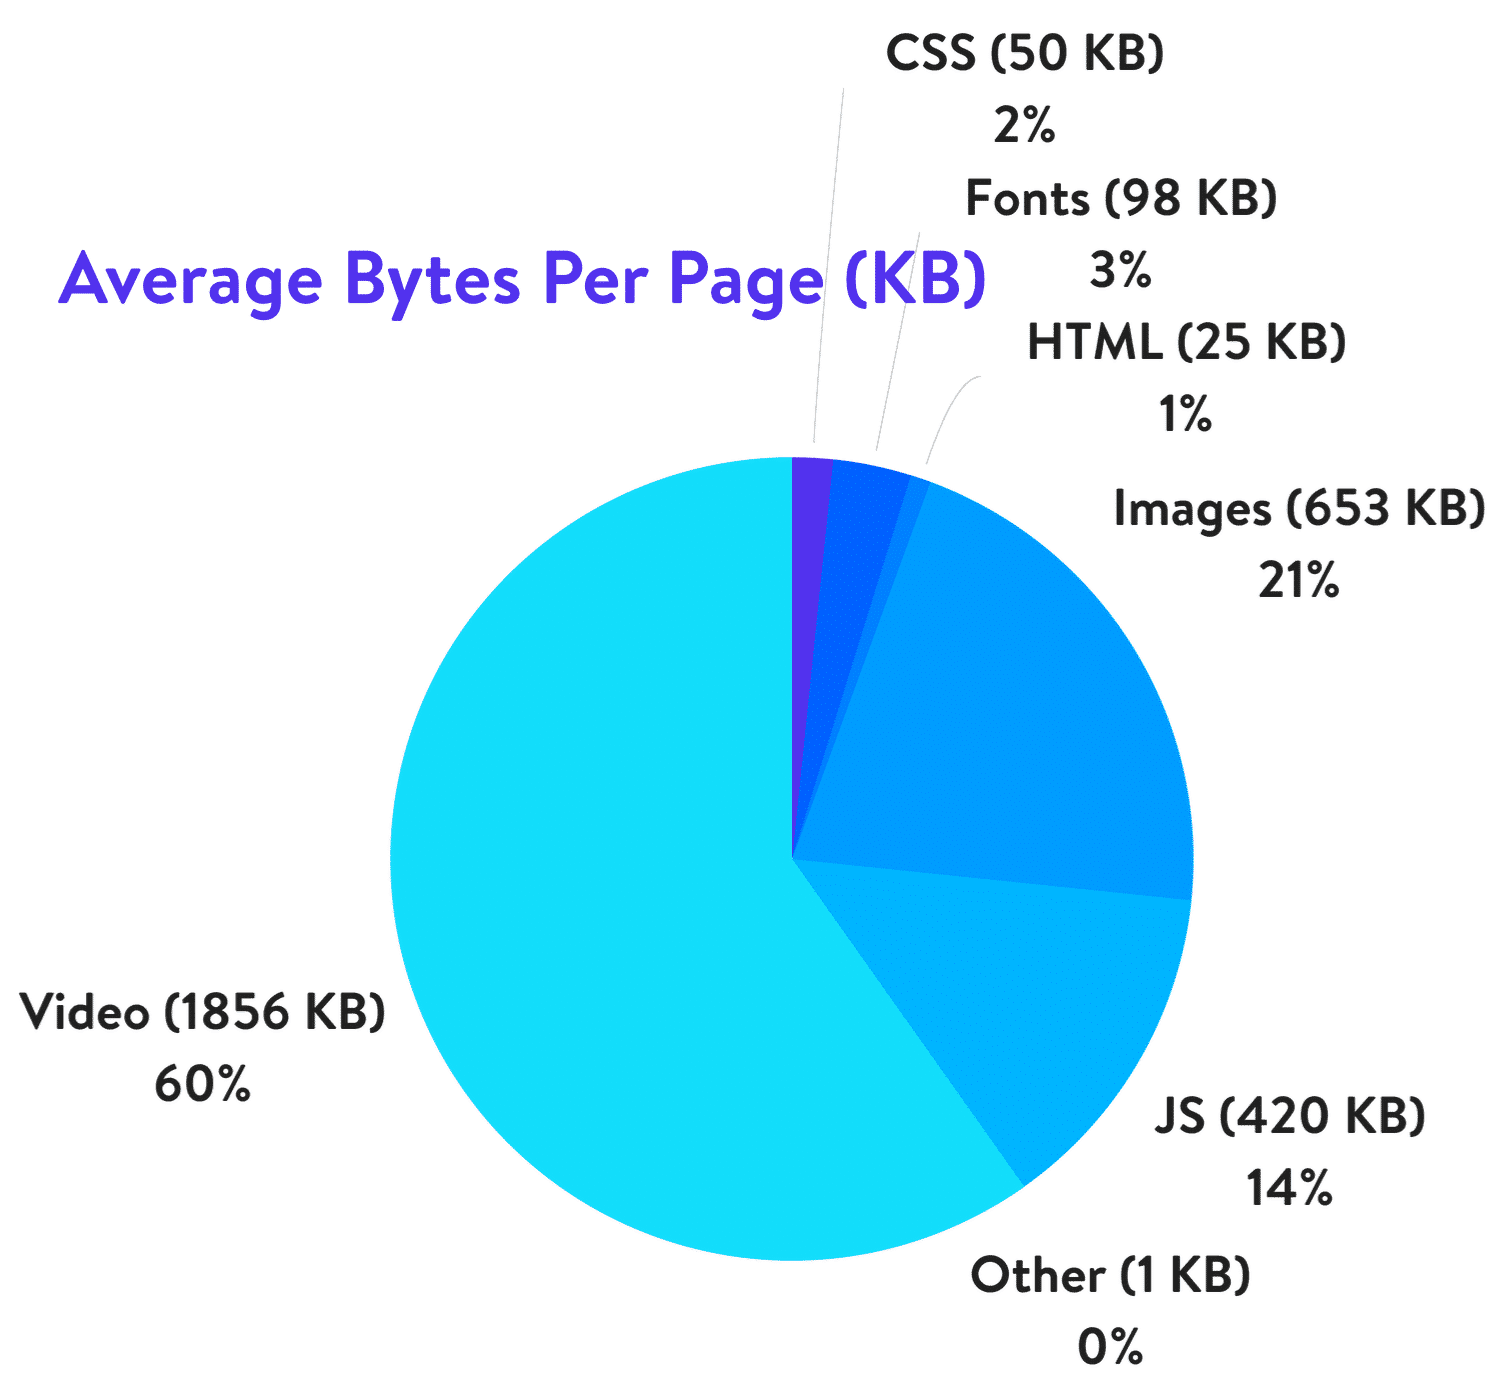
In its turn, 21% of a total webpage’s weight averagely is made up of images. Yes! Thereby, when it comes to optimizing your blog, it’s the images to start with.

Yes, big and bright visuals properly used can boost your blog but they can make things even worse if using them wrong.

How to optimize images? Below you’ll find 4 easy steps to do for image optimization and improving your blog, making it faster and much more user-friendly. 

Step 1: Acquire Imagery Legally

The very first thing is to get high-quality images and photos for your blog. Another crucial thing is that you should do that legally. There are 2 ways to choose from:

  1. Make a photo/image by yourself;
  2. Go to the photo stock or photo editors.

Today there is no need to grab any images because there are such services as Crello.com with millions of ready designs, images, photos of any themes, purposes on offer. Using it, you can also create your own visuals for any event and goal. The highlight of the service is that there you can find tons of free visuals along with paid imagery. Choose an option that suits your blog and use it for your site.

Step 2: Choose the Right File Format

There are 3 file formats commonly used for web sites. Here they are:

  • PNG is the best for logos, graphics, text-heavy designs, screenshots. Also, the format is used for images with transparent backgrounds. It has a larger file size, but it produces higher quality images.
  • JPEG is used for photographs and images with people, places, etc. Images and photos of the format can be adjusted with the perfect balance of quality and file size.
  • GIF uses 256 colors only and is the best for animated images.

Herewith, remember 2 things that JPEG is used for photos and PNG for graphics/text, GIF — animations. Definitely, besides the aforementioned formats, there are a lot of others, but not all the browsers adequately support them. So, it’s better to choose out of these 3 options. Also, before you start to modify blog images, check the format, and change it if needed.

Step 3: Mind Image Dimensions

There is always the temptation to use the best of the best and the largest of the largest. But you should be careful with your image dimensions. The truth is that there is no point in adding enormously large and heavy photos to your blog. It’s reasonable to choose the size of the images depending on the CMS and the theme used for your site. Commonly, the following sizes are used for blog websites:

  • 1,200 px X 630 px for blog graphics; 
  • 500 px X 500 px for headshot; 
  • 250 px X 300 px for sidebar.

So, when you download the image or photo with high resolution and large dimension, make sure to scale it to the proper size and weight. Thus, you can optimize the image 94% from 1.8 MB up to 103 KB only, for example.

Step 4: Compress Images

The next thing to do is to compress your images. Compression plays a critical role in image optimization. However, you should be careful when compressing images not to overdo it. Let’s see the widespread ways to compress images for blog sites. Mind that the settings depend a lot on a tool you use for the purpose.

Way 1. The most common ones like Adobe Photoshop, GIMP, On1 Photo, Affinity Photo, and others have built-in compression features — all you need to choose the option that suits you most of all.

Way 2. Also, you can save the needed images as usual and go to third-party services like TinyPNG, JPEG Mini, and others for much easier compression.

Way 3. Use the plugins of your CMS. If you use WordPress, for example, there you can install the plugins that will compress all the images loaded automatically.

Bottom Line

It’s no secret that the visuals and images included are crucial for your blog. Due to the fact that the human brain processes visuals 60,000 times faster than text, images are perfect for attracting attention and boosting user engagement. However, without optimization, large and heavy images can bring to nought all your efforts. Now you know how you can solve the problem in 4 easy steps:

  1. Go to the trusted photo stocks;
  2. Choose the right file format;
  3. Size your image;
  4. Compress the visuals without a quality loss.

Follow the advice and watch how visuals do magic with your blog!

Categories
Uncategorized

7 Tips For Landing Page Design By Industry – Leading Expert

When designing a landing page, it’s crucial to use the best practices recommended by experts. This can serve as a great means of increasing conversion rates, if done right.  

In this article, we dive deep into the matter and share with you seven landing page design tips as suggested by some of the leading UX design experts.

Let’s dig in!

1.  Integrate Discounts And Coupon Codes

This is one of the most effective ways to drive sales because it prompts the user to take action quickly, instilling the fear of missing out (FOMO), especially when accompanied by a countdown timer that highlights the discount.  

Another way to integrate coupons, discounts, and special offers into your landing page design is by creating exit-intent pop-ups. Whenever a user hovers the mouse to leave, a pop-up will appear, communicating this FOMO message and instilling a sense of urgency.

2.  Display Social Proof  

One of the first things you want your visitors to understand when entering your landing page is that you’re trustworthy. Don’t hesitate to make use of badges, trust marks, client testimonials, and user reviews.

People need reassurance, and because of that, they’ll most likely search for product reviews before they make a purchasing decision. So why not include them within your landing page?  

The average consumer reads 10 reviews before buying a product. So don’t make them postpone their decision. Give them the ability to read reviews right then and there to help move them toward conversion.  

3. Encourage Sharing On Social Media

Here’s the thing: if people love what you offer, they will most likely share it with their friends. That will increase traffic and ultimately get you more conversions.

The first step a brand identity agency takes in order to encourage people to share your page is adding social media buttons to it. This ensures a greater degree of engagement but also improves brand recognition as your brand’s logo design, recognisable copy, and other elements on the page will appear directly in people’s feeds.

4.  Keep Your Landing Page Structured  

The structure of your landing page matters. You can’t just scatter all sorts of elements throughout the page randomly. Everything needs to be placed logically so you can lead the user in going further down the page.

A landing page usually starts with a catchy headline that attracts the user’s attention, followed by a suggestive image, which has the role of maintaining the user’s attention. Next, a contact form is displayed.  

Afterwards, features of the product or service will be presented and finally, social proof will be displayed at the bottom of the page.  

5.  Focus On Page Loading Speed  

Let’s talk about the more technical side of things. The page loading speed matters a lot. In fact, this will make the user decide to either leave or stay on the page.  

Google conducted a study and found out that 53% of users will abandon a page if it doesn’t load within three seconds. In other words, you’ll be missing out on a lot of potential conversions if your landing page is not fast enough.  

To improve your page loading speed, make sure that your landing page includes a minimum amount of heavy elements. Compress all of the images before uploading them to your page, and crop the images to the correct size.

Remember. When scaling down the size of the image, cropping is your go-to method. Don’t use parameters. If you’re doing the latter, the page will load the full image first, then adjust to the size you actually want, meaning that your page will load slowly.  

6.  Create A Responsive Design

Considering that over 50% of all web activity comes from mobile devices, opting for a responsive design is crucial, especially for landing pages.  

Why? Well, devices come in all shapes and sizes, meaning that in order to increase conversions, your website needs to adapt to these changes.

Responsive design does just that, ensuring that your website looks natural and intuitive. Therefore, you’ll create a better user experience, which leads to increasing the chances of generating conversions.   

7.  Perform A/B Testing  

After you’ve finally got your landing page up and running, you still need to find out whether it can drive conversions. And the only way you can do that is through A/B testing.  

What’s A/B testing? Well, it’s the comparison of two different versions of the same piece of content, with one item changed in variation.  

Keep in mind, “one item changed” is the key here. The reason why you should do A/B testing is that it shows you what’s working and what’s not.  

For example, when doing tests on a landing page, you might create a variation of the existing one, but with a different headline. You’ll be able to see exactly which headline generated a better click-through rate and more conversions.  

Besides headlines, you can also do A/B tests on CTAs, images, buttons, navigation links, and more. 


Conclusion

Creating multiple landing pages catered toward different segments of your audience may be more effective, so always consider your audience.  

Keep things simple. Having too much going on can confuse the user and cause them to leave the page.

Emphasise the headline, subheader, and call to action.  

Furthermore, try to find ways to make the user buy your products/services on the spot. Creating a limited-time offer and offering multiple reviews within the landing page can be a great way to achieve this.

And finally, regarding the technical side of things, make the page load as fast as possible, go for a responsive design and don’t forget to do A/B testing.